I was playing a Star Wars game with my son (who’s a recent convert to the franchise), and we were discussing the interesting eyes a blue character called “Shriv Suurgav” had, and my son was asking why they looked like that. (I won't include an image here due to risk of copyright infringement, but you can look him up if interested - here's a good example image)
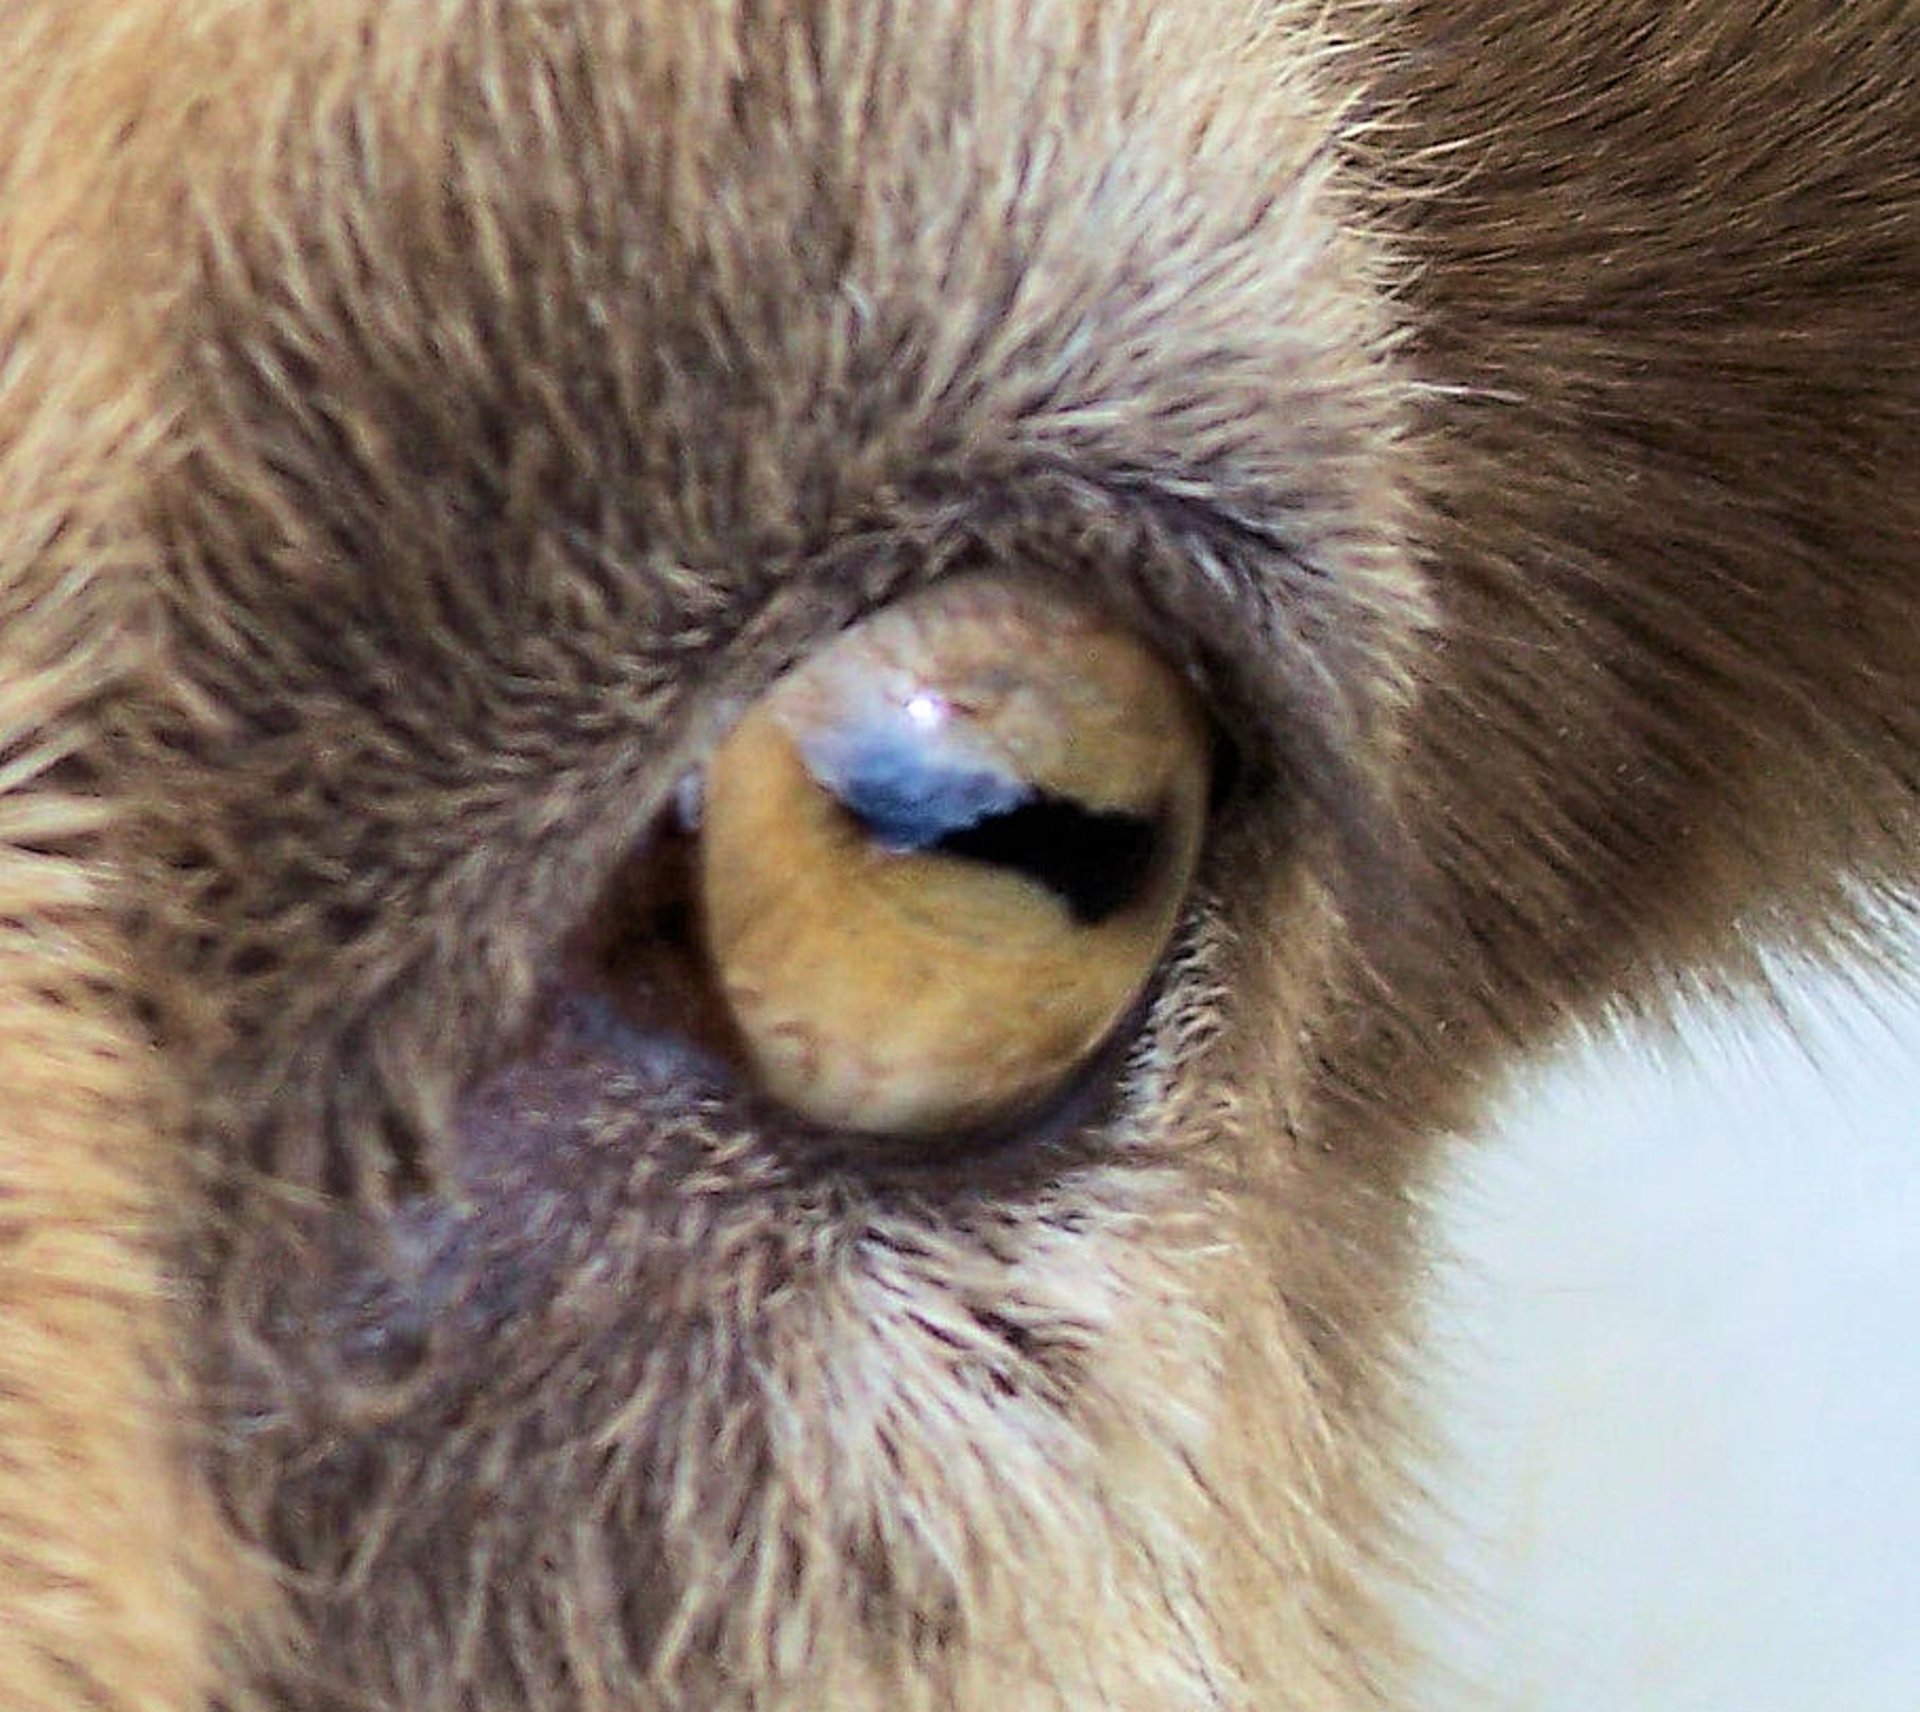
I mentioned the goat-like appearance, and that not all animals had round pupils, and had very different perceptions of the word that we do as humans. So this got me thinking about what would it look like if we suddenly were looking through goat eyes, and it set me on another of my rabbit holes.
I knew they had a much wider field of vision compared to humans (likely due to being a prey animal), but here were to main takeaways:
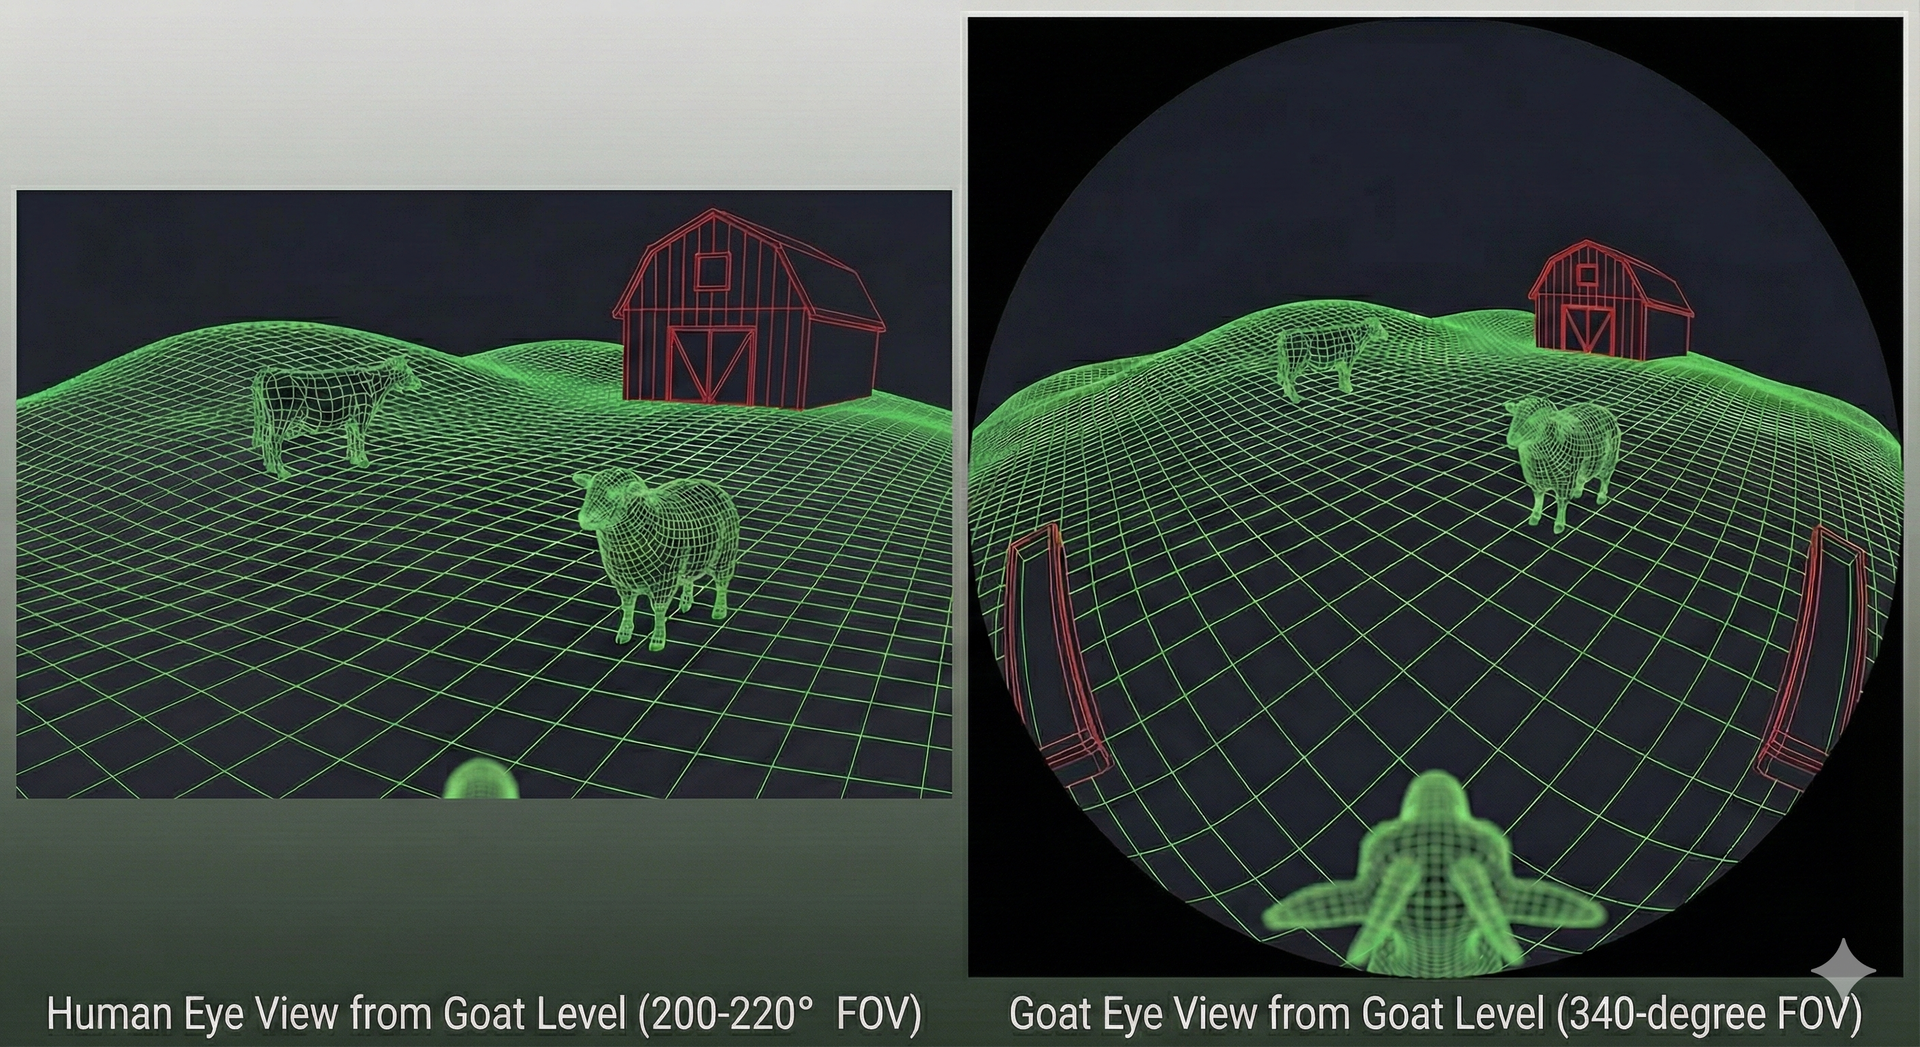
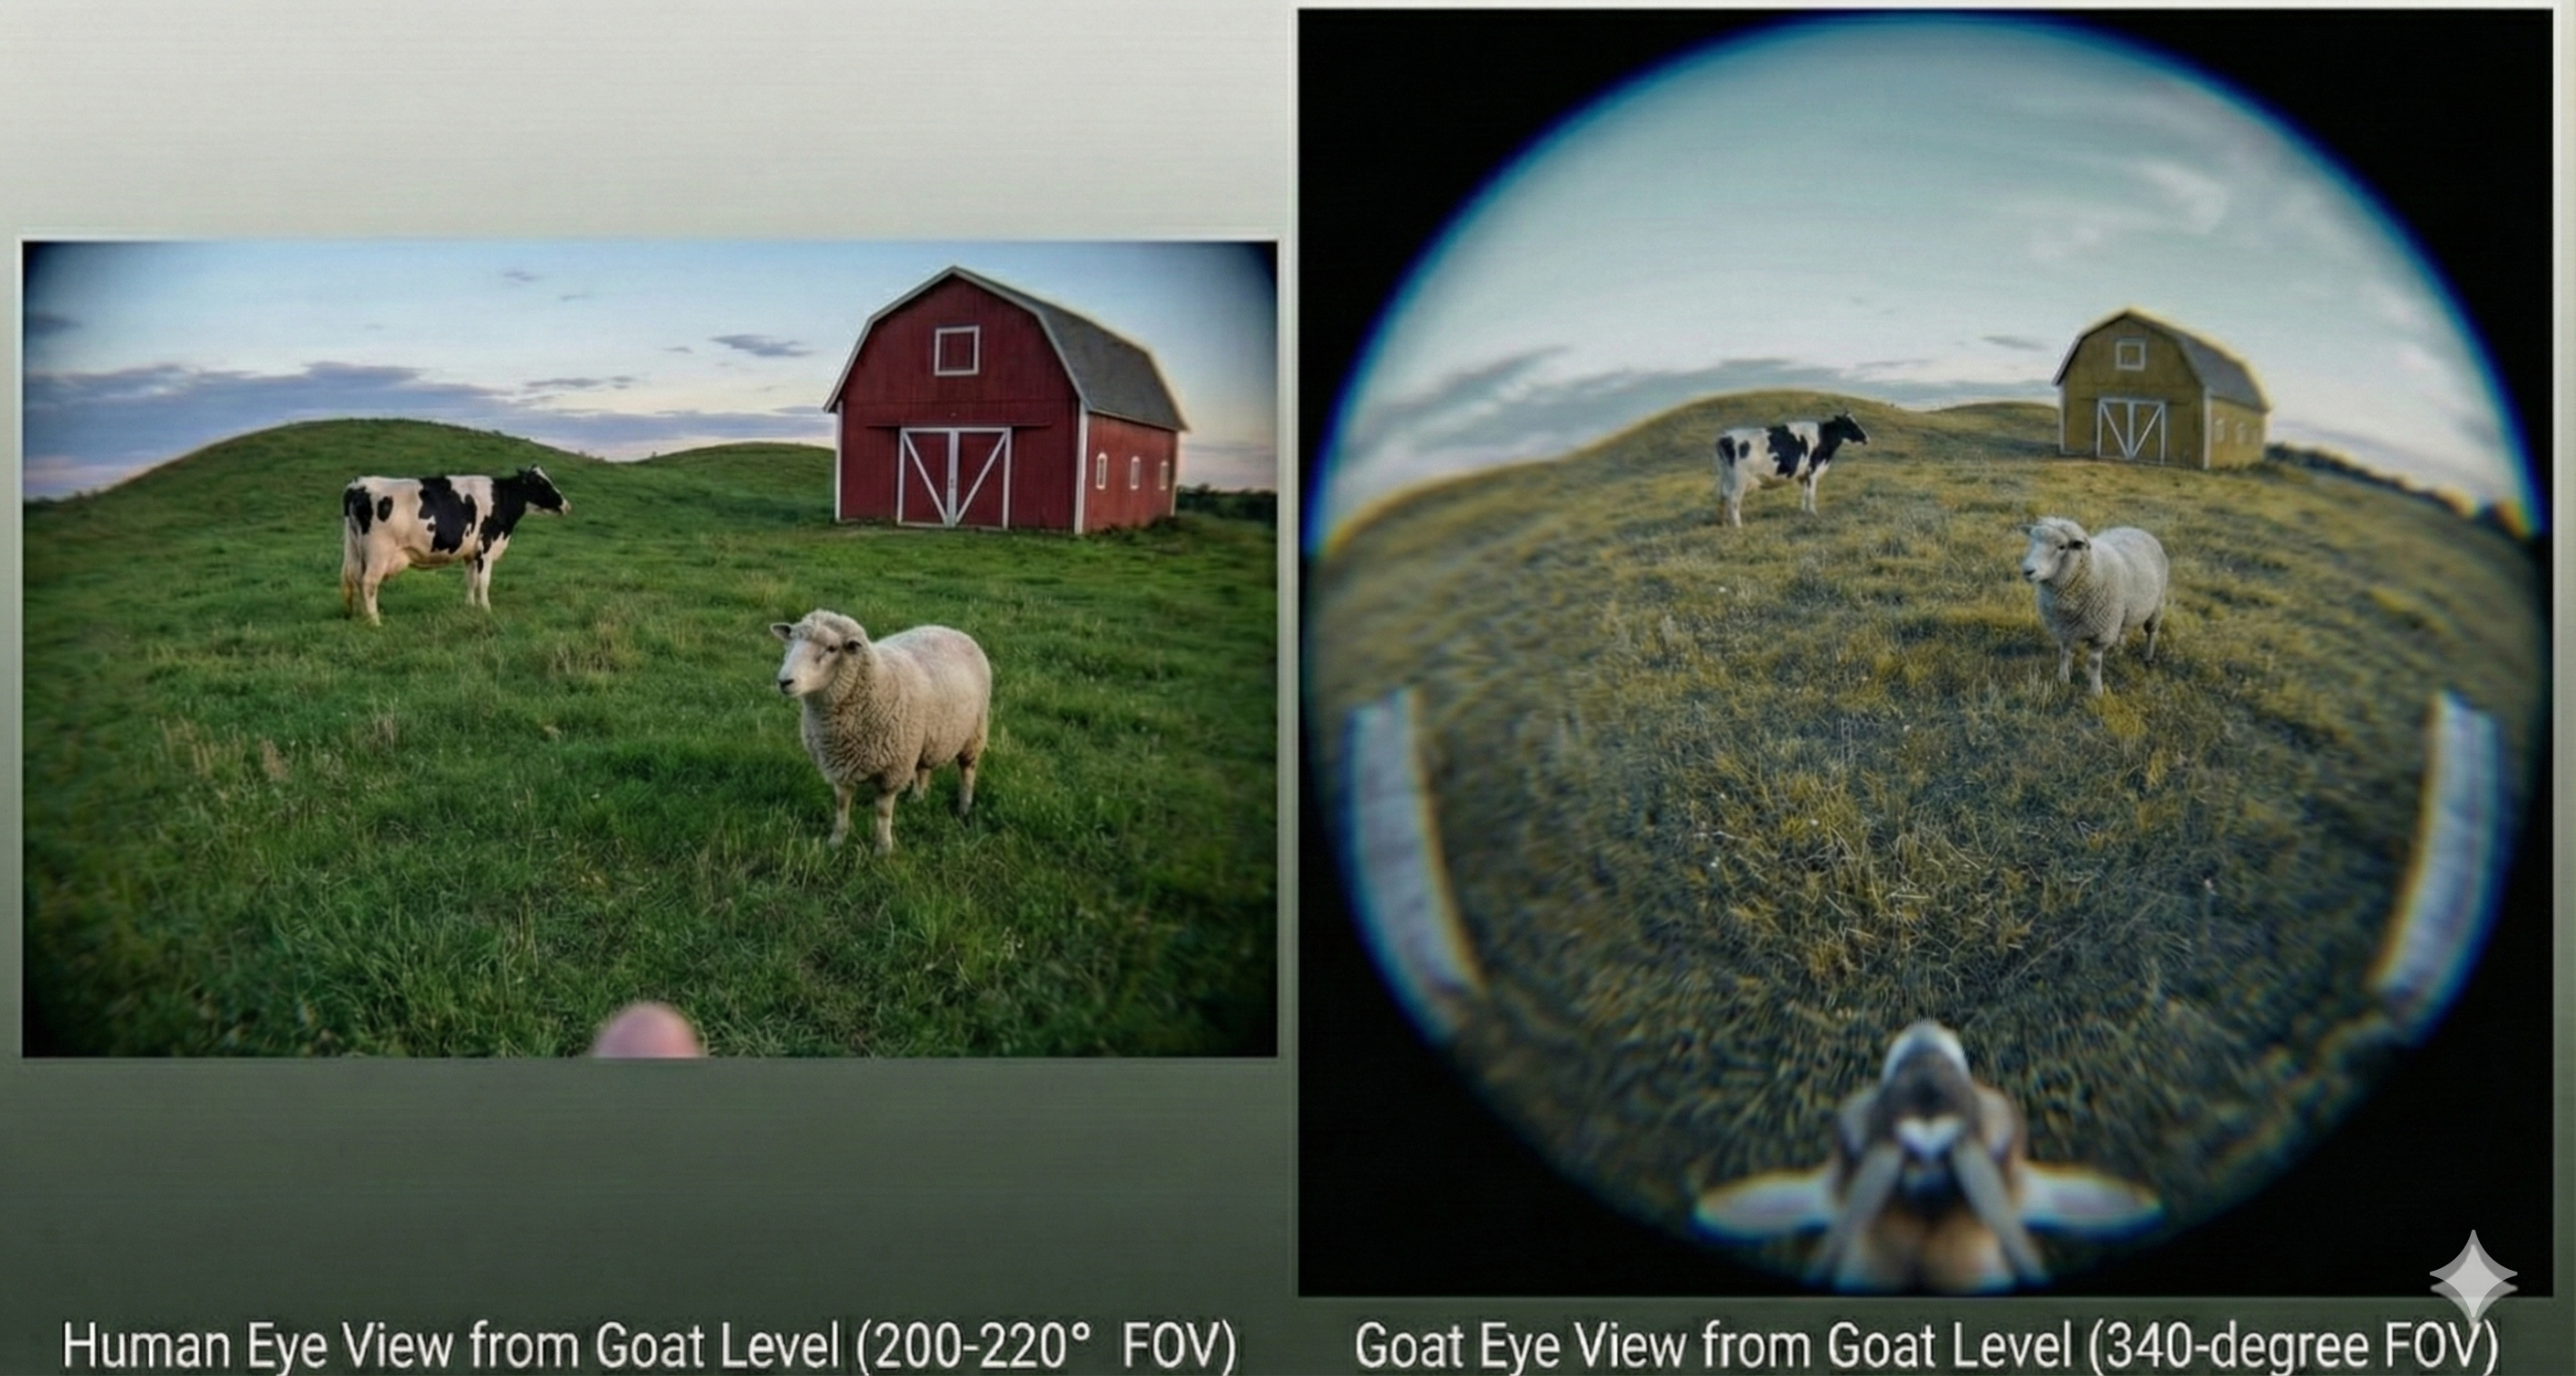
- Field of View: Goats see a panoramic 320–340° (almost completely around their head), whereas humans see only about 180° facing forward. So they could probably see their own backs.
- Pupil Shape: Goats have horizontal rectangular pupils to scan the horizon; humans have circular pupils.
- Blind Spots: Humans are blind to everything behind them; goats only have a tiny blind spot directly behind their head and right in front of their nose.
- Depth Perception: Humans have excellent binocular 3D depth perception; goats have mostly flat (monocular) vision with a small area of depth overlap in the front.
- Horizon Stabilization: Goat eyes rotate in their sockets to stay parallel to the ground when they lower their heads; human eyes tilt with the head.
- Color Vision: Goats are dichromatic (seeing mostly blues and yellows, unable to see red); humans are typically trichromatic (seeing red, green, and blue).
If we were to see through a goat’s eyes, because the human brain is wired for binocular, forward-facing vision, suddenly switching to the lateral and panoramic vision of a goat would likely be a jarring, psychedelic, and sensory-overloading experience. And it might feel very weird as the eyes rotate in their sockets to keep things horizontal! So I thought: what about simulating the field-of-view and vision; what might it actually look like? A bit of back-and-forth with Gemini and ChatGPT, I arrived at a render like this:
I then decided to see how easy it would be to generate some python code to replicate this plot directly. I’m not expert in 3D rendering and design, and knew an AI would be far better at handing rotation matrices, coordinate systems and projections, and converting human language into more machine-understandable code, so decided to spend a couple of hours seeing what I (and some vide-coding) could come up with. Results were… mixed. It’s likely too much of a complex set up, but came pretty close, and I imaging some 3D modeling software would be much quicker.
The first couple of attempts did reasonably ok. This wasn’t a fair test between Gemini, Claude and ChatGPT, but I found both Gemini (Nano Banana) and ChatGPT (5.1 Thinking) did OK but were still far from the target image.
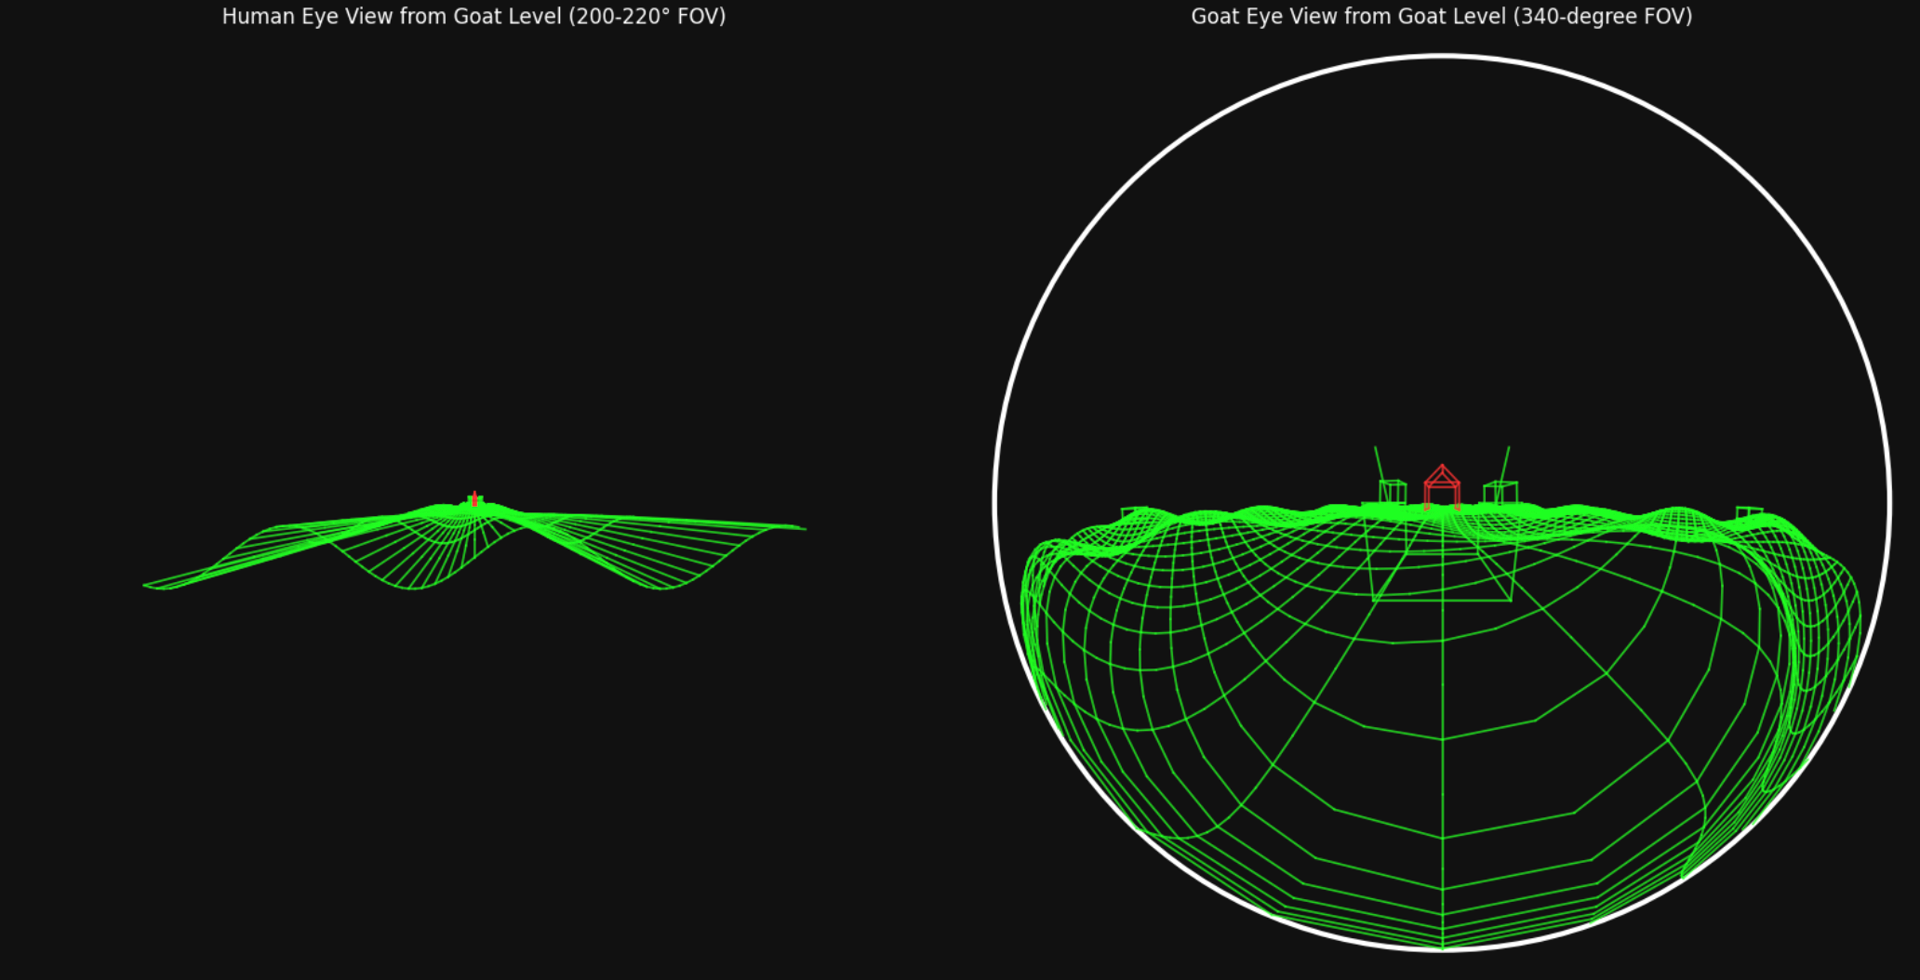
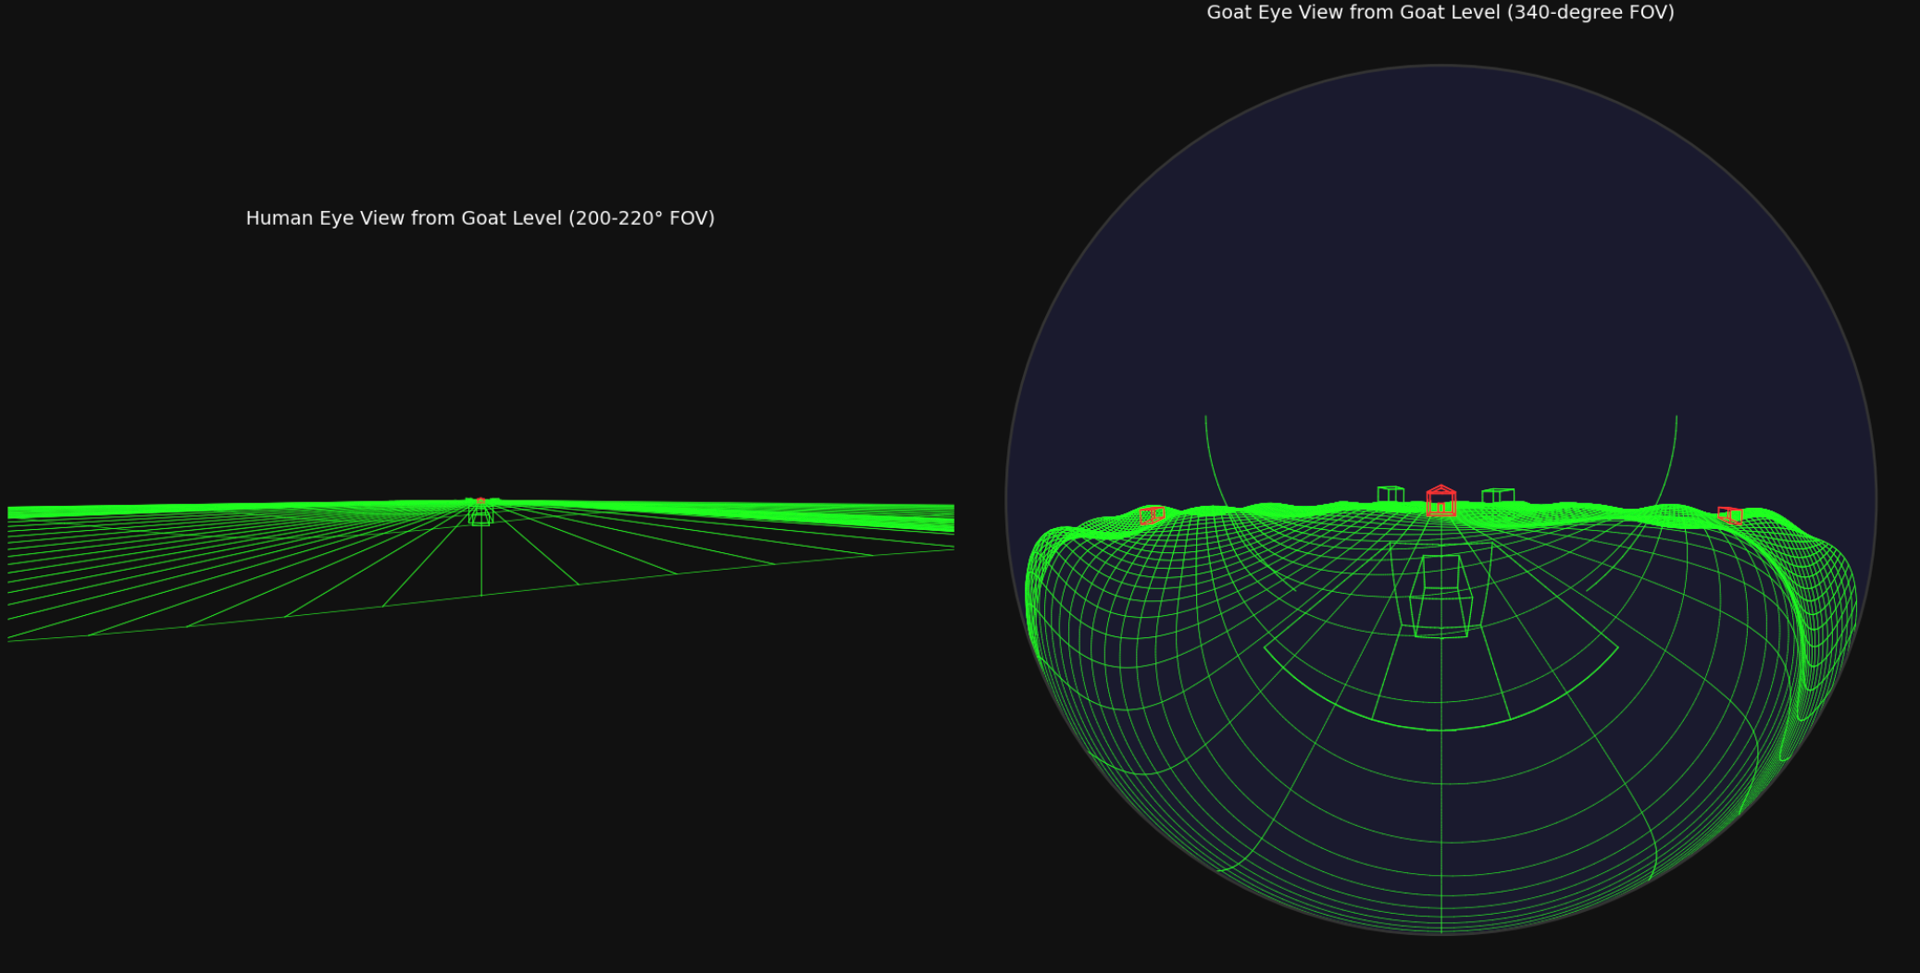
My key takeaways:
- Complexity of 3D Rendering: Building complex, custom 3D projections from scratch in Matplotlib is difficult and demands a strong grasp of underlying graphics pipelines. It requires a deep understanding of 3D transformations, camera models, and rendering pipelines.
- Horizon Stabilization: I had no idea this was even a thing, but it’s pretty cool!
Sample code
import numpy as np
import matplotlib.pyplot as plt
from matplotlib.patches import Circle
# --- 3D Helper Functions ---
def transform_to_camera(points, cam_pos, cam_rot):
"""Transforms world coordinates to camera coordinates."""
# points: (N, 3) array of world coordinates
# cam_pos: (3,) array of camera position
# cam_rot: (3, 3) camera rotation matrix
translated = points - cam_pos
# Multiply by transpose of rotation matrix to transform INTO camera frame
transformed = translated @ cam_rot.T
return transformed
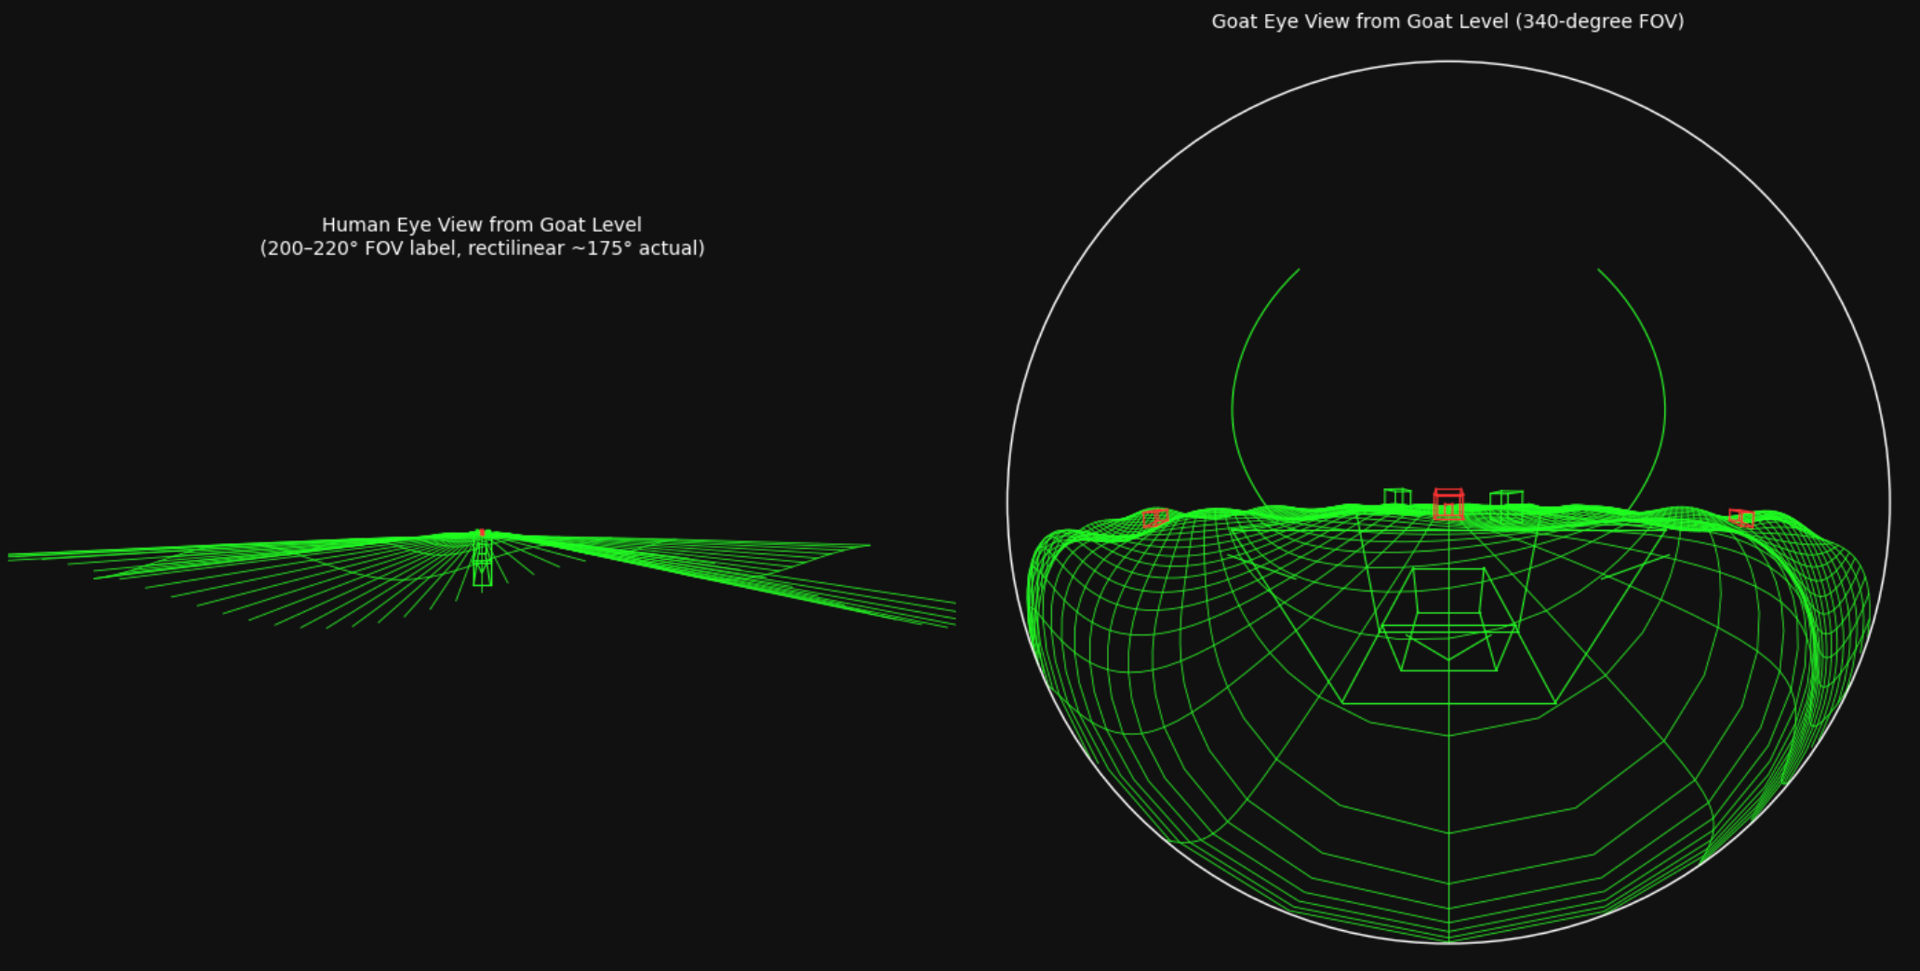
def project_perspective(points, fov_h_deg, aspect_ratio):
"""Projects points using a rectilinear perspective projection."""
x, y, z = points[:, 0], points[:, 1], points[:, 2]
# 1. Filter points behind the camera (near clipping plane)
# Using a small positive value for z to avoid division by zero
mask = z > 0.5
# 2. Calculate focal length based on horizontal FOV
fov_h_rad = np.deg2rad(fov_h_deg)
# Limit FOV to just under 180 to prevent tangent explosion
fov_h_rad = np.clip(fov_h_rad, 0.1, np.pi - 0.1)
f = 1.0 / np.tan(fov_h_rad / 2.0)
# 3. Apply projection formula
# Only perform calculation on valid points to save work and avoid errors
x_valid = x[mask]
y_valid = y[mask]
z_valid = z[mask]
# **CORRECTION HERE**: Aspect ratio should divide X or multiply Y to compensate
# for a wide screen. We divide X to keep Y scale consistent with FOV.
x_proj = f * x_valid / z_valid / aspect_ratio
y_proj = f * y_valid / z_valid
return x_proj, y_proj, mask
def project_fisheye(points, max_fov_deg):
"""Projects points using an equidistant fisheye projection."""
x, y, z = points[:, 0], points[:, 1], points[:, 2]
# 1. Convert to spherical coordinates in camera frame
# r_xy is the distance from the optical axis (Z-axis)
r_xy = np.sqrt(x**2 + y**2)
# theta is the angle from the forward Z-axis (0 to pi)
theta = np.arctan2(r_xy, z)
# phi is the azimuthal angle around the Z-axis (-pi to pi)
phi = np.arctan2(y, x)
# 2. Define the maximum angle visible
max_theta = np.deg2rad(max_fov_deg / 2.0)
# 3. Filter points outside the maximum FOV
mask = theta <= max_theta
# 4. Apply Equidistant projection model: R = f * theta
# We normalize so that R=1 at the edge of the FOV (theta = max_theta)
R = theta[mask] / max_theta
# 5. Convert polar projected coordinates (R, phi) back to Cartesian on the image plane
x_proj = R * np.cos(phi[mask])
y_proj = R * np.sin(phi[mask])
return x_proj, y_proj, mask, phi[mask]
# --- Scene Generation Functions ---
def create_ground_mesh(x_range, z_range, grid_spacing):
lines = []
color = '#22ff22' # Neon green
# Lines along Z (constant X)
for x in np.arange(x_range[0], x_range[1] + grid_spacing, grid_spacing):
z = np.arange(z_range[0], z_range[1], 0.5)
x_arr = np.full_like(z, x)
# Create undulating hills
y = 0.8 * np.sin(x_arr/3.0) * np.cos(z/3.0) - 0.5
points = np.stack([x_arr, y, z], axis=1)
lines.append((points, color))
# Lines along X (constant Z)
for z in np.arange(z_range[0], z_range[1] + grid_spacing, grid_spacing):
x = np.arange(x_range[0], x_range[1], 0.5)
z_arr = np.full_like(x, z)
y = 0.8 * np.sin(x/3.0) * np.cos(z_arr/3.0) - 0.5
points = np.stack([x, y, z_arr], axis=1)
lines.append((points, color))
return lines
def create_wireframe_box(center, size, color):
w, h, d = size
cx, cy, cz = center
# 8 vertices of a box
v = np.array([
[cx-w/2, cy, cz-d/2], [cx+w/2, cy, cz-d/2],
[cx+w/2, cy, cz+d/2], [cx-w/2, cy, cz+d/2],
[cx-w/2, cy+h, cz-d/2], [cx+w/2, cy+h, cz-d/2],
[cx+w/2, cy+h, cz+d/2], [cx-w/2, cy+h, cz+d/2]
])
# 12 edges connecting the vertices
edges = [
(0, 1), (1, 2), (2, 3), (3, 0), # Bottom loop
(4, 5), (5, 6), (6, 7), (7, 4), # Top loop
(0, 4), (1, 5), (2, 6), (3, 7) # Vertical pillars
]
lines = []
for s, e in edges:
lines.append((np.stack([v[s], v[e]]), color))
return lines
def create_barn(center, size):
w, h, d = size
cx, cy, cz = center
color = '#ff3333' # Neon red
# Base of the barn
base_lines = create_wireframe_box((cx, cy, cz), (w, h, d), color)
# Roof
roof_height = h / 1.5
v_roof = np.array([
[cx-w/2, cy+h, cz-d/2], [cx+w/2, cy+h, cz-d/2], # Roof base front
[cx+w/2, cy+h, cz+d/2], [cx-w/2, cy+h, cz+d/2], # Roof base back
[cx, cy+h+roof_height, cz-d/2], # Roof peak front
[cx, cy+h+roof_height, cz+d/2] # Roof peak back
])
# Connect roof base to peaks and peaks to each other
roof_edges = [(0, 4), (1, 4), (2, 5), (3, 5), (4, 5)]
roof_lines = []
for s, e in roof_edges:
roof_lines.append((np.stack([v_roof[s], v_roof[e]]), color))
return base_lines + roof_lines
def create_viewer_self(cam_pos, type):
color = '#22ff22'
if type == 'nose':
# A small box just in front of and below the camera
center = cam_pos + np.array([0, -0.15, 0.4])
size = (0.15, 0.08, 0.2)
return create_wireframe_box(center, size, color)
elif type == 'goat_head':
# A larger box and "horns" to represent the goat's head
center = cam_pos + np.array([0, -0.25, 0.5])
size = (0.35, 0.25, 0.4)
lines = create_wireframe_box(center, size, color)
# Simple horns
horn1 = np.array([center + [-0.15, 0.25, -0.1], center + [-0.3, 0.5, 0.1]])
horn2 = np.array([center + [0.15, 0.25, -0.1], center + [0.3, 0.5, 0.1]])
lines.append((horn1, color))
lines.append((horn2, color))
return lines
return []
# --- Main Scene Setup ---
scene_lines = []
# Create a large ground grid
scene_lines.extend(create_ground_mesh((-25, 25), (-15, 50), 1.0))
# Place objects in the scene
scene_lines.extend(create_barn((0, -0.2, 25), (5, 4, 6)))
scene_lines.extend(create_wireframe_box((4, 0.3, 10), (1.5, 1.8, 2.5), '#22ff22')) # Sheep
scene_lines.extend(create_wireframe_box((-6, 0.8, 18), (2.2, 2.5, 3.5), '#22ff22')) # Cow
# Troughs placed behind the camera (negative Z)
trough1 = create_wireframe_box((-12, 0.1, -6), (2.5, 0.5, 1.2), '#22ff22')
trough2 = create_wireframe_box((12, 0.1, -6), (2.5, 0.5, 1.2), '#22ff22')
trough_lines = trough1 + trough2
# Camera position (low, goat-level) and rotation (identity = looking forward down +Z)
cam_pos = np.array([0.0, 0.8, 0.0])
cam_rot = np.eye(3)
# "Self" objects for the viewer
nose_lines = create_viewer_self(cam_pos, 'nose')
goat_head_lines = create_viewer_self(cam_pos, 'goat_head')
# --- Plotting ---
# Set up the figure with a black background
fig, axes = plt.subplots(1, 2, figsize=(16, 8), facecolor='#111111')
# =========================================
# 1. Left Plot: Human Wide Perspective View
# =========================================
ax_human = axes[0]
ax_human.set_facecolor='#111111'
ax_human.set_title('Human Eye View from Goat Level (200-220° FOV)', color='white')
ax_human.axis('off')
human_view_lines = scene_lines + nose_lines
fov_h = 210 # Extremely wide horizontal FOV
aspect = 16/9 # Widescreen aspect ratio
for points, color in human_view_lines:
# 1. Transform to camera space
points_cam = transform_to_camera(points, cam_pos, cam_rot)
# 2. Project
# x_proj and y_proj contain only the projected coordinates of valid points.
# mask is a boolean array the same size as the original 'points'.
x_proj, y_proj, mask = project_perspective(points_cam, fov_h, aspect)
# 3. Draw lines
if np.any(mask):
# Map original indices to their new position in the projected arrays
orig_to_proj_map = np.full(len(points), -1, dtype=int)
valid_indices_orig = np.where(mask)[0]
orig_to_proj_map[valid_indices_orig] = np.arange(len(valid_indices_orig))
# Iterate through the original points to draw segments
for i in range(len(points) - 1):
# A segment is valid only if BOTH its endpoints passed the mask
if mask[i] and mask[i+1]:
idx1_proj = orig_to_proj_map[i]
idx2_proj = orig_to_proj_map[i+1]
ax_human.plot([x_proj[idx1_proj], x_proj[idx2_proj]],
[y_proj[idx1_proj], y_proj[idx2_proj]],
color=color, linewidth=1.2, alpha=0.8)
# Set the view limits to match the projection plane bounds [-1, 1]
ax_human.set_xlim(-1, 1)
ax_human.set_ylim(-1/aspect, 1/aspect)
# Force the aspect ratio of the plot area itself to match the projection
ax_human.set_aspect(aspect)
# =========================================
# 2. Right Plot: Goat Fisheye View
# =========================================
ax_goat = axes[1]
ax_goat.set_facecolor='#111111'
ax_goat.set_title('Goat Eye View from Goat Level (340-degree FOV)', color='white')
ax_goat.set_aspect('equal')
ax_goat.axis('off')
goat_view_lines = scene_lines + trough_lines + goat_head_lines
fov_fisheye = 340
for points, color in goat_view_lines:
# 1. Transform to camera space
points_cam = transform_to_camera(points, cam_pos, cam_rot)
# 2. Project
# phi_proj is needed to detect lines that wrap around the back of the sphere
x_proj, y_proj, mask, phi_proj = project_fisheye(points_cam, fov_fisheye)
# 3. Draw lines
if np.any(mask):
orig_to_proj_map = np.full(len(points), -1, dtype=int)
valid_indices_orig = np.where(mask)[0]
orig_to_proj_map[valid_indices_orig] = np.arange(len(valid_indices_orig))
for i in range(len(points) - 1):
# A segment is valid only if BOTH its endpoints passed the mask
if mask[i] and mask[i+1]:
idx1_proj = orig_to_proj_map[i]
idx2_proj = orig_to_proj_map[i+1]
# **CRITICAL FIX FOR FISHEYE**:
# Check if a line segment tries to wrap around the back of the view.
# If the difference in azimuthal angle (phi) is too large, don't draw it.
phi1 = phi_proj[idx1_proj]
phi2 = phi_proj[idx2_proj]
# Calculate smallest difference between angles
angle_diff = np.abs(np.arctan2(np.sin(phi1 - phi2), np.cos(phi1 - phi2)))
# If the jump in angle is less than 90 degrees, it's a safe line to draw.
if angle_diff < np.pi / 2.0:
ax_goat.plot([x_proj[idx1_proj], x_proj[idx2_proj]],
[y_proj[idx1_proj], y_proj[idx2_proj]],
color=color, linewidth=1.2, alpha=0.8)
# Add a clean circular border to the plot
circle = Circle((0, 0), 1.0, transform=ax_goat.transData, color='white', fill=False, linewidth=3)
ax_goat.add_patch(circle)
ax_goat.set_xlim(-1.05, 1.05)
ax_goat.set_ylim(-1.05, 1.05)
plt.tight_layout()
plt.show()